Wednesday, July 23, 2014

Now without further ado...

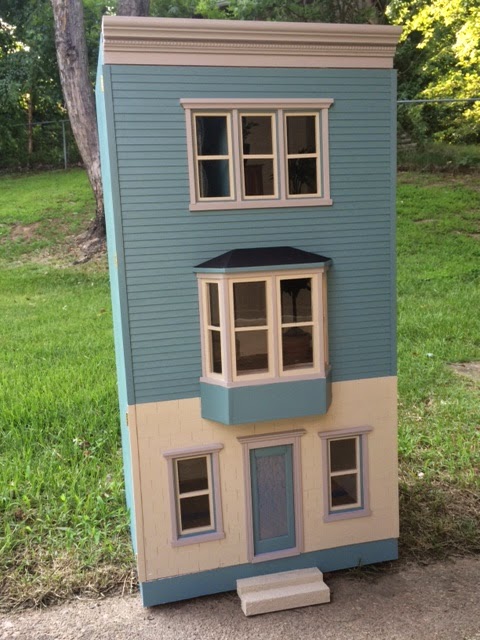
I present to you The Dollhouse Spa. My very first Build-Along project (my first complete project). Its a townhouse used as a Spa/Nail salon. Enjoy!


The windows, bay window, and door were purchased on eBay.


The paint color is Valspar "La Fonda Villa Fountain."  I also used this color in "Something Old Made New".


 The stone color was made with mixed colors and sand.


 The mail box and numbers were purchased from Mainly Minis.

The black leather chair, loveseat, and plant were purchased from Miniatures.com.

The flooring is bamboo place mats from World Market. They no longer have them in stock but the rugs are similar.  They don't look half as good as Mini Mod Pod's but I am still learning. I also got the mole hair napkin rings (end tables) from there as well in the clearance section. I glued the round wooden tops on the rings to make the tables.

 
 The desk counter I painted with vanilla paint then used clear spray paint to get that shiny finish.. accessories see post here.


The leather chair I bought on eBay last year. The desk accessories (phone and frame you can't see) I bought last year too. The others are scrapbook stickers.


The desk is covered with contact paper and scrapbook paper. The sign is made from the bamboo mats and the same scrapbook paper.

 
The coffee table was made from scrap wood pieces and scrapbook paper. The bowl I bought last year from a mini collector.  The leather balls in the bowl are jewelry pieces.


The zebra art work is a borrowed image from Google.  Then I painted wooden frames I bought from Michaels red.  I used Modge Podge to glue the image on the frames.


 The magazine stand was purchased on eBay. I painted the stand gray. It came with the magazines.


-
 

The Spa beds are handmade by me, see the post here. The wall art is borrowed from Google images. The clock is from Manor House Miniatures . The chair purchased from Dollhouse Junction. The tree from Michaels.

 
I made the plant in the back using planters from Miniatures.com. The wall unit was purchased last year along with the jars. The hot rocks was shown in this post. The towels are baby bath cloths.  And another borrowed image from Google.


The towels again are baby bath cloths. Wall art borrowed images from Google. 


 The toilet and sink are from ELF Miniatures.


The shower I can proudly say I made...see the post here. The mirror is from Miniatures.com. The basket is from Hobby Lobby. It was originally a plant and I rearranged/re-purposed the basket.


The interior door is made of plastic. It came with a lot of dollhouse items I bought last year. The knobs are from ELF Miniatures.


The walls are covered scrapbook paper. The wall is made of foam board. The furniture was purchased on Amazon.


The stool was made from a wooden block and scrapbook paper. The accessories were bought last year. The nail salon table...see post here.


 The wall art was borrowed from Google images. And the other was made by me see post here.


 The interior windows I did not finish so I have nothing share. I plan to finish in the near future.


Nothing is permanently affixed because I plan to make changes in the near future.


 And to think it all started from this...
(actually 2 kits)


Surprise Package

Happy Hump Day!! Hope you are all doing well this great day. Yesterday, I received a package in the the mail from Real Good Toys. They sent out a thank you note offering 20% off my next purchase and a T-shirt. It was a really nice gesture since the Build-Along was not a contest and I did not expect to get anything. I think the project was great for a "newbie" like me. I enjoyed the process and learned a lot. They are suppose to have the photos up today (YAY!). I can't wait to see what others have created.  Anyway, thanks Real Good Toys!!


                                                                       The Front


The Back

Tuesday, July 15, 2014

Dollhouse Lighting Woes


A look through the bay window of the Build A-long project.. I did not add any lights in this house nor non-working lamps/light fixtures. In the past I have not been so successful with applying tape wire or round wire to electrify the Victoria’s Farmhouse.  In fact I got so frustrated, that I decided not to use any.  And I decided to avoid this altogether for the Townhouse.  However, I couldn't help wondering what the Townhouse/Spa would look like with lights, so I used a book light to get the effect of lighting.  Here are the results:

 I wish I had the time and patience to fully execute this...It adds dimension. And makes the rooms come alive. Oh well...


It's all about the details

So...I created my interpretation of a Spa for the Build A-long project. I thought I would share some of the things (props) I used to sell the theme.

 I used foam to create cotton balls,and toe separators. I painted a piece to sponge for a buffer and wood trimming for a emery board. The table I bought on e-bay some time last year. It has a working drawer. I used it temporarily until I make a salon nail station.

 The Mi World OPI nail stand, I painted some of the tops to get more variety of colors. This idea was mentioned by Call of the Small in her blog post.


 I made hot rocks by hole punching foam board, painting the discarded circles black, then flattened them. Lastly, painted them with clear nail polish to achieve that high glossy look.


I  "borrowed" these Spa flyers/price list from Google images. I also did the same for the business cards (I printed them on photo paper for gloss). I made the stands and card holder from scrap wood pieces. I am learning that details make the space.

Friday, July 11, 2014

Summer Shower


The last few weeks has been crazy busy for me.  I just returned from vacation and feel like I need another vacation to recuperate. Time away is always good for the soul, especially when it involves family, friends, food, and fun in the sun.  I have to admit that I was a little anxious to get back to my miniatures, primary the Build A-long project.  The dead line has come and gone. I did complete the exterior; however, the interior is incomplete.  I decided to send my photos in anyway; after all it is my first contest/project/build a-long. I am proud of what I accomplished.  I am not going to post any pictures just yet.  I want to complete the interior.  Now that the Build A-long is over, I will work on finishing the Victoria’s Farmhouse.  Hope everyone is enjoying their summer!  I am having a great summer.  Okay, I am going to share what I have been working on for the interior of the Build A-long. 


This was my inspiration (above). I think I 'borrowed" this photo from a Craigslist Ad.

  
 The shower walls  are constructed from  scrap wood and scrap book paper. I used .010 thickness clear styrene plastic sheets for glass doors.


 The floor is made from foam board, mat board, and  scrap book paper. The drain is a metal grommet found around my house.


 I used these items found around my house to make the shower hardware.


This was my inspiration for the hardware ("borrowed" from Google Images).


The handle I made from wood strips and painted metallic silver.

 Isn't it amazing what you can create from a little imagination and scraps?  A year ago I would have bought a shower. It was fun creating and I love how it turned out.